Riobel service and stop valves
Preparation |
Before servicing stop valves or service valves, water supply to the valve body must be turned off completely. Either with the main of the house or with shutoffs except for the ones on the actual valve body. See article How to safely shut off water supply to a Faucet or Shower
What are service valves comparing to stop valves? |
When in the closed position, Stop Valves will shut off water completely, but Service Valves may allow a little bit of water to go through when in the closed position. It is normal and not a default. They are used to shut off the water at the faucet only for the duration of the repair and not for a long period of time. If you need to shut off water for a long period, you should use the main house shutoff. Or separate shutoffs if some were installed.
| Service or stop valve/Parts image | Shower valve model used in and production date | How to remove, clean and replace | How to Open or Close | ||
|---|---|---|---|---|---|
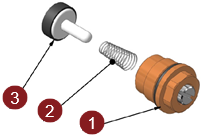
405-111 (Stop valve)
Parts Image:
|
Used in:
|
Removal:
Cleaning:
Reinstallation:
|
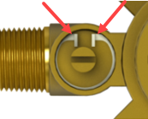
To open: Using a flathead screwdriver, turn the center screw counterclockwise until it sits flush to the rim.
To close: Using a flathead screwdriver, turn the center screw clockwise all the way inside.
|
||
0-960 (Stop valve)
Parts Image:
|
Used in:
|
Removal:
Cleaning:
Reinstallation:
|
To open: Using a flathead screwdriver, turn the center screw counterclockwise until it sits flush to the hex nut.
To close: Using a flathead screwdriver, turn the center screw clockwise all the way inside.
|
||
Ball valve (Service valve) (no specific part number)
Parts Image:
|
Used in:
|
Removal:
Cleaning:
Reinstallation:
|
They are called 1/4 turn. You can rotate the slotted screw nonstop. When the slot is horizontal, service valve is opened and vertical, it's closed.
Opened
Closed |
||
7-441 with a retaining C-Clip snap ring (Service valve)
Parts Image:
|
Used in:
|
Removal:
Cleaning:
Reinstallation:
|
They are called 1/4 turn. You can rotate the slotted screw nonstop. When the slot is horizontal, service valve is opened and vertical, it's closed.
Opened
Closed |
||
7-441 with a retaining U-shaped clip (Service valve)
Parts Image:
|
Used in:
|
Removal:
Cleaning:
Reinstallation:
|
They are called 1/4 turn. You can rotate the slotted screw nonstop. When the slot is horizontal, service valve is opened and vertical, it's closed.
Opened
Closed |
||
7-683 (Stop valve)
Parts Image:
|
Used in:
|
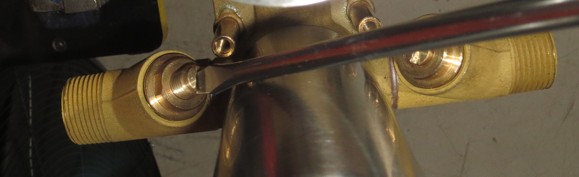
Removal: **Please note that Stop valve nut might be difficult to reach as it is installed at an angle on the valve body
Cleaning:
Reinstallation:
|
To open: Using a flathead screwdriver, turn the center screw counterclockwise until it stops.
Opened To close: Using a flathead screwdriver, turn the center screw clockwise until it sits flush to the nut.
Closed |


|
|
