Installation Instructions Undermount Stainless Steel Sinks
 |
For PDF document in English, French and Spanish click here: Installation Instructions Undermount Sinks |
INSTALLATION INSTRUCTIONS UNDERMOUNT SINKS
These instructions are for installing ROHL Undermount stainless steel sinks. By Undermount, one identifies a sink that is installed from below the countertop. The ROHL Undermount sinks can be installed with three different kinds of reveal: positive, negative or no reveal. Each one will make your sink look different (see drawing). The decision on which kind of installation to use must be done prior to commencing the job.
|
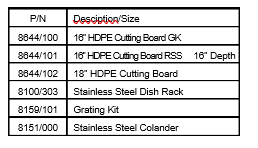
The most popular installation is the zero reveal. Zero reveal: the cut-out exactly matches the bowl’s dimension. This is the most often used installation method. To utilize accessory* products, install the sink with a zero reveal. *The following accessory products require a zero reveal installation.
|
|

| Positive reveal: The countertop edge is approximately 1/8” back from the edge of the sink, exposing thus the sink rim. All the ROHL undermount sinks feature 1” of finished rim. |  |
| Negative reveal: The countertop extends over the edge of the sink on all sides by approximately 1/8”. Prior to making the cut-out for such an installation, please check if the eventual accessories such as colanders or cutting boards will fit properly. |  |
To obtain a perfect cut-out please use the dwg file of the cut-out profile, to be found on Rohl’s website. The sink itself can also be used as a cut-out guide. Rohl recommends that undermount sinks should be installed by a professional installer, in order to obtain the best results. Prior to commencing any operation, check your sink for damage. Do not install a damaged sink. Please remember that it is the installer’s responsibility to follow local plumbing and building regulations.
Please remember that the warranty will be considered void if these installation instructions are not followed.
The following instructions refer to the installation of a Rohl undermount stainless steel sink on a solid surface countertop only. The minimum thickness of the actual countertop material must be 1/2”. However, the presence of a 1” counter-frame around the sink is advisable.
Requirements vary for installation on granite, marble or stone countertops. Please check this out with your fabricator for more details.
TOOLS AND MATERIALS NEEDED FOR INSTALLATION |
|
|
Eye protection (safety glasses) and ear protection are highly recommended |
6” bar clamps |
|
Undermount clips, screws and brass inserts supplied with the sink (please note that these come in a separate plastic bag, make sure you do not throw it away with the packing) included |
Silicone adhesive sealant |
|
Stop block (needed to drill holes of equal depth) |
|
| 3/8” thick plywood sheet to cut a template | Tape measure |
| Pencil (not permanent) | Router |
| Ball peen hammer (6 oz.) | Drill and drill bit |
| Screwdriver | File |
| Framing square | 5/8” template guide |
| Alcohol | Wood braces |
STEP 1 (recommended for professional installers only)Create a template To obtain a perfect cut-out, a CAM (computer-aided-machine) can be used; the dwg file correspondent to the cut-out can be found on Rohl’s website. As an alternative: using a framing square, make a line from front to back of the bottom of the countertop, marking the center of the sink. Draw a line, parallel to the front edge of the countertop, to indicate how far back the sink should be positioned. Normally this measure is 2” to 2-1/2" from the front, depending also on the countertop overhang, and the type of sink. To make a template, position the sink upside down on a piece of plywood, and draw a line following its perimeter. Be sure to cut on the inside of the template, in order to obtain the desired reveal. The template size should be adjusted in order to obtain the desired type of reveal, other than zero reveal (overhang or positive reveal). Cut the plywood template, taking particular care to exactly follow the corner radius. |
 |
STEP 2 (recommended for professional installers only)Make the sink cutout Locate the center of the sink template, and align it with the center mark on the countertop. Position the template with the front edge corresponding to the front edge line previously drawn on the countertop. Fasten the plywood template to the countertop using 6” bar clamps. Position the router over the template and cut around it, ensuring that the router follows the edge of the template. The finish of the inside of the cutout should be done according to the recommendations of the countertop supplier. |
STEP 3 (recommended for professional installers only)Attach the undermount clips Position the sink so that the reveal is equidistant. Then drill the holes for the brass inserts on the underside of the countertop. Use a drill bit with a stop block, in order to avoid drilling too deep, and eventually through the countertop. For 1/2" countertop material, the holes should be 3/8” deep. Use four clips on the long side of the sink, and three clips on the short side. The holes should be drilled 1” back from the cutout edge. |
 |
 |
NOTE: The clip is 3/4" wide and 2-3/4" long. It may be too long in some cases. If so, make a brace of wood or solid surface material, buff it up against the sink, and screw it into the cabinet wall (this must be done on site). Make sure that the screw does not go through to the other side of the cabinet. |
STEP 4 (recommended for professional installers only)Installing the sink Clean the bottom of the countertop and the rim of the sink with denaturated alcohol. Then apply some silicone adhesive sealant to the top edge of the rim of the sink, and position the sink in the countertop. |
STEP 5 (recommended for professional installers only)Tighten the clips Tap in the brass inserts for the clips into the pre-drilled holes, with the slotted end first. Thread a wingnut onto a screw, up near the head, then tighten the screw into the brass insert into the countertop material. Repeat for each clip. NOTE: Do not fully tighten a clip at a time. Tighten partially a clip, then tighten partially the clip opposite from it. After you have partially tightened all clips, repeat the process to fully tighten them. This process secures a proper and installation, and avoids any damage to the sink. NOTE FOR MARBLE OR GRANITE: For these materials, lead inserts which are glued in, should be used in place of the brass inserts. CARE AND USE:
See care and use brochure for more cleaning information and warranty. |
LEGAL DISCLAIMER
All technical data and information provided in this document are to be intended as a public service to customers of ROHL and consumers of our products. Technical specifications are subject to change without obligation of prior notification. ROHL may also discontinue or modify any model without obligation of prior notification. While ROHL strives to provide you with the most accurate descriptions and information, accuracy and completeness cannot be guaranteed. ROHL is not responsible for, nor does it have any liability for any mistakes or typographical errors, including liability for incidents, consequential, or special damages. All products should be inspected promptly upon delivery and before any alterations or improvements are done in preparation for installation. ROHL assumes no liability for the use of such information and/or for any damages incurred through its use.
Nothing contained in this document is to be construed as contractual or providing any form of warranty or representation on behalf of ROHL. ROHL makes no warranties, express or implied, including but not limited to any warranty of merchantability or of fitness for a particular purpose, as to the information contained herein or the products described herein.