House of Rohl Solutions

Error on Trim Installation Guide 360


This article explains a xx360 faucet trim installation mistake and how to resolve it.

This error concerns models prior to October 7th 2024.

clipboard_e205f8878b231d4eac68171201d393a6b.png
Error in the installation guide for 360 lavatory faucet
FAUCET MODELS AFFECTED:
INSTALLATION GUIDES AFFECTED:

PRIOR TO OCTOBER 7TH 2024

  • SA360 or TSA360
  • VY360 or TVY360
  • GS360 or TGS360
  • PX360 or TPX360
  • GUI-Trim360-REV00
  • INS11328
  • INS11328A
SYMPTOMS:

clipboard_ef0381b93276da9feca953249c009760d.png

  • Incorrect "OFF" lever position
  • When faucet is OFF, lever should be straight at you

clipboard_ef323c1733fa7c6ae8a5053d32198e119.png

  • Incorrect "ON" lever position
  • When faucet is ON, lever should be up
EXPLANATION:

clipboard_e24116df8cce1b108a0844432d1ecfcc7.png


  • This is the rough in valve exploded parts of the 360 wall mount lavatory faucet and the parts that interest us (numbered in red)
  • This faucet has a 4 point handle installation, meaning it allows handle placement above, below, left or right of the spout.
  • Steps 4 and 5 of the 2 trim installation guides cited above mention turning the valve seat (6) with the plug (3) so that the hot and cold water supply are at the top and the pin alignment holes at the bottom.


This is incorrect.

  • See details in the following explanation of incorrect and correct installation.
Incorrect installation:

clipboard_ef40a7337db95ab0e075ac5a04bd9ca51.png


  • This is the incorrect installation of Step 4 of those guides. It is showing the wrong positioning of the valve seat once turned; the hot and cold water entry on top (red arrow) and the pin alignment holes on bottom (blue arrow). Error is repeated on all 4 handle-spout positioning as per pictures below. 

clipboard_ee34e697310dae2ea806646b21ed0ba8c.png

clipboard_e9fff2169dce9eb1ea333805551467766.png

clipboard_e011036e392ed2f1922124a3f747bb643.png

clipboard_edaf965190e62454d14e218e4a3ec88e5.png

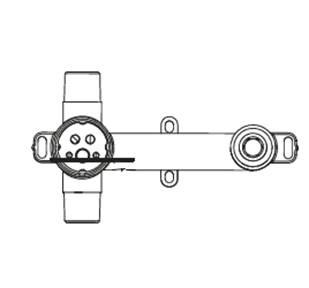
Correct installation:

clipboard_ece44f7652a0331383d6ac9d4240f544f.png


  • This is the correct and final positioning of the valve seat. It is showing the hot and cold water entry on bottom (red arrow) and the pin alignment holes on top (blue arrow). This positioning should be repeted for all 4 point handle installation as per pictures below.

clipboard_e0679c020e66bfc94af2ba1588fae5da0.png

clipboard_e9827db0d57c6d65b98bf1a1f9c7ab2b0.png

clipboard_ebb925308ab74a13536d763cc861e1433.png

clipboard_e8bbde43af93224f833ab0646a5b8c647.png

RESOLUTION: 
Preparation:
  • Important: Turn off the water supply at the faucet before starting. You can either turn off the main supply to the house or close the shut-off valves under the lavatory. Then open the faucet again to empty it of residual water. Failure to do so could result in flooding or injury.
  • Recommended toolsLong nose pliers, handle and spout removal may require a 2mm or 2.5mm Allen key.
Instructions: 


A - If faucet is at installation:

- Turn the valve seat (item 6) (do not remove the seat) with the red plug (item 3) so that hot and cold water supplies are on the bottom and alignment pin holes on the top. See corrected step 5 below.

- Then proceed with the rest of the trim installation from the guide.

STEP 5: 

clipboard_e68f0364e4a44a932f247a24f6c8667e6.png clipboard_ee5993af71d219216d78ddda2ad86f1c1.png clipboard_ef32ff0a9727f1c88be8e17843b9c7147.png clipboard_e182776624ebec571a487ff92f777a3f1.png

B - If faucet is already installed: 

  • - Remove handle and dome to access the rough valve seat. You may also need to remove the finishing plate, plate gasket and spout if the rough valve seat is not easily accessible. Be careful not to scratch the finished parts. For help with those steps, visit our website at https://houseofrohl.ca/riobel/ to view your faucet part’s sheet.

clipboard_e3e6969792b175dce832f59cacc64446f.png

  • Once the rough seat is accessible, remove the  retaining clip (item 5)

clipboard_e7f87fd5a6295d1698791a8d0068791fc.png

  • With long nose pliers positioned in the pin alignment holes (red arrows) turn the seat 180 degrees so water supplies are at the bottom and pin alignment holes at the top. (Be extra careful not to scratch the seat and do not try to remove the seat)

clipboard_e4e5d6ed0ea83957df36d3a7c26e28758.png

  • Put back retaining clip as pictured here.
  • Put the trim back in place by reversing steps and test the faucet.
  • If it did not resolve the issue, please contact us.
 

Contact Us:

Canadian ConsumersEmail or Call 1-866-473-8442

U.S. ConsumersEmail or Call 1-800-777-9762

  • Was this article helpful?