Faucet and Shower Body Cleaning and Flushing
Cleaning and Flushing |
|
When installing a new cartridge, House of Rohl recommends the valve body be cleaned and flushed out. This eliminates any mineral build-up and loose debris that may have accumulated inside the valve body. Debris could damage the new cartridge or block water flow, potentially leading to delays and increased repair costs. The instructions below are based on the product type, Deck mount, Wall mount Lavatory or Shower Faucet. Please note that the water may come out of the valve body with considerable force, follow the steps below to control the flushing process. |
 |
 |
Preparation |
- The following instructions assume the handle, associated handle pieces and cartridge have been removed. For additional information visit solutions.houseofrohl.com and select the type you are repairing.
- Recommended Tools: A soft nylon bristle brush (ex: toothbrush or bottle brush) and towels. (If you are working on a Deckmount Faucet, you will also need a large bowl).
- You may need two people for Deckmount Faucets, review step 3:
Instructions |
|
|
Deckmount Faucets: |
Wallmount and Shower Faucets: |
|
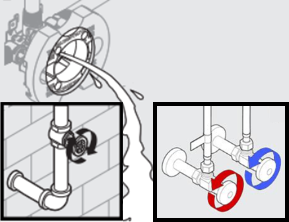
Step 1: Shut off water supply |
Should you require assistance with this step, please consult the following resource |
|
|
Step 2: Prepare the Area |
Wrap a towel around the base of the faucet and have a large bowl ready. | Wrap a towel around the base of the valve to prevent water from leaking behind the wall. |
|
Step 3: Begin the Flushing Process
|
To clear the system, water will need to be forced through the valve body. One person will position a large bowl upside down over the open valve body to redirect the water back into the sink. A second person will need to turn the water on slightly to allow a small flow of water to go through the system. If you are using hot and cold shutoff's, this process will need to be repeated (one at a time) for both sides. |
To clear the system, water will need to be forced through the valve body. As a safety precaution, House of Rohl recommends standing outside of the tub or shower when the faucet shutoff's or water main supplies are turned on. Turn the water on slightly to allow a small flow of water to go through the system. If you are using hot and cold shutoff's, this process will need to be repeated (one at a time) for both sides.
|
|
Step 4: Clean the Valve Body |
Gently scrub the inside walls of the valve body with a nylon bristle brush to remove any mineral build-up. |
|
|
Step 5: Prepare for Cartridge Installation |
Using a rolled up towel, remove any excess water from the bottom of the valve body. If the water is not eliminated, the cartridge will not fit all the way back in. |
|
|
Step 6: Install the Cartridge |
For additional information on House of Rohl products visit solutions.houseofrohl.com and select the type of product you are repairing. The guide will contain repair details, troubleshooting and specific information on assembling handles associated with that style of product. |
|
|
|
