MB1938 and MB1939: Installation Instructions
Preparation: |
|
Shut water supply to the faucet off: Important: Turn off the water supply at the faucet before starting. You can either turn off the main supply to the house or close the shut-off valves if the faucet is equipped with them. Then open the faucet again to empty it of residual water. Failure to do so could result in flooding or injury. |
MB1938 & MB1939 Pressure Balance Trim with Diverter Installation Instructions |
 |
|
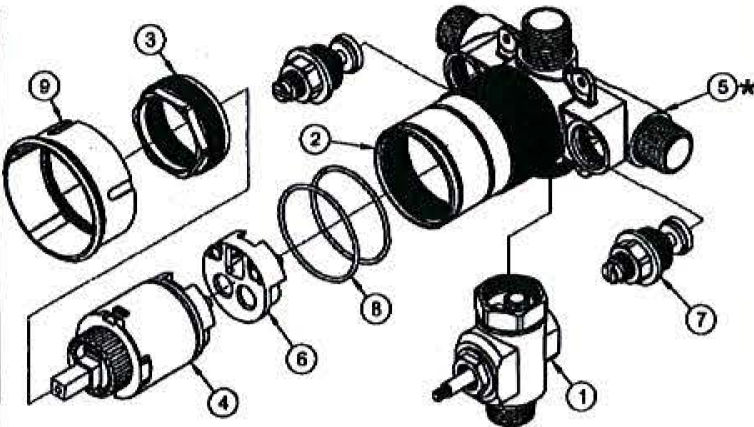
Trim Parts Instructions
Please note: Faceplate nut is provided on the rough valve not with the trim
Please note: O-ring (5a) is installed on the inner diamet of the Trim Ring (5b)
Use of 2MM Allen key is needed
Use of 2MM Allen key is needed
|
Specification Details |
 |
|
5-6 GPm @ 60 PSI
|
GUARANTEE TO THE CONSUMER |
|
WARRANTY Rohl LLC warrants this product to be free from defects in materials or workmanship for as long as the original consumer purchaser owns their home. Rohl LLC will provide free of charge, at its option, replacement part(s) or product (or a comparable alternative product) to replace those which have proven defective in materials or workmanship. We will not assume liability for labor expended or damages accruing from the use of material purchased from us. If material is defective, the limit of damage is the price of the defective material. Proof of purchase (original sales receipt) from the original consumer purchaser must be made available to Rohl LLC for all warranty claims. The warranty is not transferable and is extended solely to the original purchaser of the product. |
|
WARRANTY EXCLUSION This warranty is for normal domestic use only and excludes defect or injury caused or resulting from misuse, abuse, or neglect, accidental damage or improper installation.The lifetime limited warranty does not apply to replacement of components where damage is caused by normal wear and tear. |
|
WARRANTY WILL BE INVALID IF: A. The product has not been correctly installed (whether by a plumber, contractor, service provider or member of the purchaser's household) in accordance with the manufacturer's instructions. B. The surface finish of the product has been damaged by use of unsuitable cleaning agents or improper materials, i.e. damage by agents containing acidic, corrosive, abrasive, or alcohol-based substances or through scouring the surface by abrasive cloths. C. Damage has occurred to component parts due to foreign materials in the water supply (e.g. stones, metal shavings). All water lines must be flushed clear of all debris prior to installing the product. It is strongly recommended that in areas where foreign materials may be present in the water supply, an inline filter be fitted on both the Hot and Cold inlets. This will ensure your warranty remains valid. D. The product has been exposed to excessive high water temperature (above 80o Celsius or 175o Farenheit). |
|
PARTS ONLY WARRANTY This warranty does not cover labor charges incurred and/or damage sustained in installation, repair or replacement, nor incidental or consequential damages. |
 |