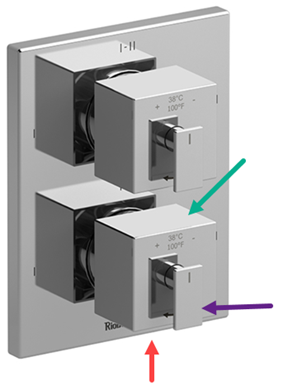
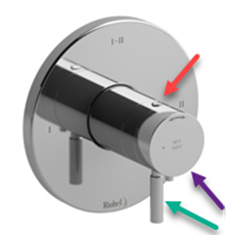
Replacing a thermostatic coaxial cartridge in a 2, 3 and 4-way valve
|
This article explains step-by-step how to replace a coaxial thermostatic cartridge in a 2, 3 and 4-way valve, whether it is model prior to April 2013 of after. |
Preparation |
-
Important: Turn off the water supply at the faucet before starting. You can either turn off the main supply to the house or close the shut-off valves if the faucet is equipped with them. Then open the faucet again to empty it of residual water. Failure to do so could result in flooding or injury.
- Recommended tools: 2.5mm allen key, Phillips and flathead screwdriver (if you remove the plate), adjustable wrench, soft brush
Instructions: |
|
|
Identify
|
Disassemble
|


|
Identify
|
Disassemble
|


|
Identify
|
Disassemble
|
Disassemble
|

|
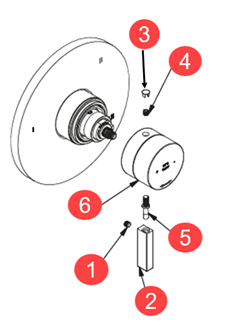
Identify
Tip : To remove the temperature knob: a) press down b) lift up
|
Disassemble
|
Disassemble
|
|
Disassemble
|
||


|
Plate without exposed screwsA or B
1) Remove finish plate 2) Unscrew screws 3) Remove back plate |
Plate with exposed screws
1) Unscrew screw caps 2) Unscrew screws 3) Remove plate |


Step 3: Shut off water supply through service valves |
Single handle assembly valve
|
Double handle assembly valve
|


Step 4: Remove trim (according to model), nut. cartridge and clean |
|
2-part model
a) Unscrew the decorative ring b) Slide out sleeve |
1-part model
Slide out sleeve |


|
|
|


|
|
|

|
A 2, 3 or 4-way valve - From April 2013 to today |
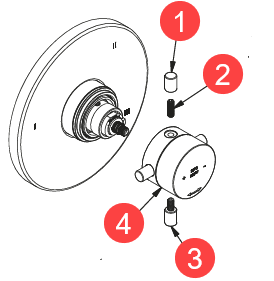
Insert the new cartridge while making sure that the red check valve is on the hot side and blue on the cold side |
|||
B 2-way valve only - From April 2013 to today
|
|
|||


|
|
|
|
|


|

|
Tip: |
|
|
|


 |