U.5542 Cartridge Kit Diverter Instructions
PERRIN & ROWE® REPAIR KIT FOR U.5383, U.5542CONCEALED DIVERTER (U.5542CARTKIT) |
|
Preparation: |
|
|
|
Instruction: |
|
|
U.5542 CART KIT
|
U.5542R U.5383 Body of the U.5383 is shown for this instruction. The U.5542 is raw brass and will be serviced in the wall.
|
|
1. Using the crescent wrench gently remove the small screw at the end of the handle. Rotate the screw counterclockwise to remove.  |
2. By hand unscrew the bell by rotating counterclockwise.
|
|
3. Using a crescent wrench, turn the diverter cap counterclockwise to remove completely.  |
4. Using a small screwdriver, remove the “C” clip on the top of the diverter cap. Remove the plastic vernier adaptor by hand by pulling off. 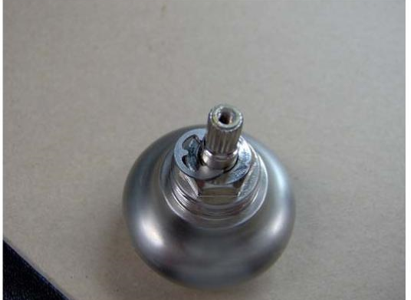 |
|
5. Rotate the 9.21383 counterclockwise to remove  |
6. Push down on the 9.21384 to remove from the bottom of the diverter cap.  |
|
7. Clean with stiff toothbrush and vinegar, Remove any mineral deposit with 200 grit wet/dry sandpaper. (not shown) Regrease.  |
8. Clean and regrease the valve the same way as step 7 for the caps.  |
|
9. Push in on the 9.21384 until it will not go any further.  |
10. Push the “C” clip back into the lower grove on the 9.21384. Replace vernier adaptor.  |
|
11. Put back inside the bottom of the diverter cap, turn clockwise until it stops.  |
12. Replace the diverter cap back into the body of the diverter and use a crescent wrench to tighten clockwise until it stops.  |
|
13. Replace the dome by screwing clockwise until tight. Replace the handle and then the screw by rotating clockwise until tight. (a crescent wrench may be needed to tighten the screw).  |
14. Note: Make sure that the final installation looks like this, the diverter handle must be on the right pointing up, and the handshower hose outlet must be on the left side facing down.  |


 |