Troubleshooting R940551 extension
Symptom: |
You have installed the extension kit R940551, and the handle is grinding or won't move.
The Potential Issue: |
There are two common reasons for the handle to be grinding, or not moving after the installation of this extension kit.
- The Friction Washer is missing in the Brass Extension Assembly.
- The Long Sleeve is not screwed in all the way on the Rough Valve.
Preparation for the Repair: |
- Always shut off the main water supply to valve before servicing
- Tools required:
- 5/32" hex wrench or Philips Head Screwdriver for handle removal (depending on model)
- Knife or similar tool to remove silicone around escutcheon plate (if any)
- Thermometer (The may be needed if temperature limits need to be reset)
- Flashlight (Optional)
Parts Legend: |
|
|
  |
Reason 1: Friction Washer is missing in the Brass Extension Assembly |
If this washer was not installed, the handle will rest against the Long Sleeve (1) and this will cause grinding, or restrict handle movement.
How to verify the Friction Washer is in place- |
Step 1: Remove the Handle (as per your model)
| Model A: Apothecary Collection (Lever or Cross) | Model B: Tenerife Collection |
|---|---|
|
Using a 5/32" hex wrench, unthread the hex screw counterclockwise |
This cap is held in the handle by an o-ring. Using a tiny sharp object, delicately pull it out. |
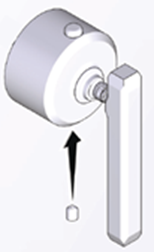


| Step 2: Determine if the Washer is Present in the Brass Extension Assembly | |
|
Step A: Once the handle is removed, pull the Stem Extension (3d) to remove it. **Picture above is for reference only |
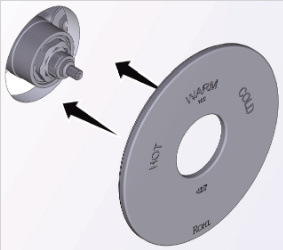
Step B: At the entry of the Adapter (3c), you should see the friction washer (could be black or white). A flashlight might help at this step. **Picture above is for reference only |
Was the Washer present in the Adapter?
|
|


Reason 2: Long Sleeve is not screwed in all the way |
If the long sleeve is not completely screwed in against the valve body, the Handle once installed on the Stem Extension, will rub against the Long Sleeve (1) when rotating and cause grinding sound. In an extreme occasion, this could prevent the handle from moving properly.
How to Correct a Long Sleeve installation Issue- |
|
Step 1. Pull on Adapter (3c) to remove it. **Picture shows Adapter with temperature limit stop (4) installed |
Step 2. Unthread the faceplate ring/sleeve assembly to remove |
Step 3. Pull out the escutcheon plate to access the valve. Use cutting knife if silicone was applied. |
|
Step 4. Screw the Long sleeve (1) on the valve all the way until it stops. There will be some threads from the valve body still showing. Picture is for reference only |
Step 5. Reinstall the faceplate |
Step 6. Thread the faceplate ring/sleeve assembly on the Long sleeve until the ring rests flat against the decorative escutcheon plate and provides a good seal. |
|
Step 7. Insert the Brass Extension assembly into the opening of the valve. Remove and keep the screw for handle re-installation, but make sure the washer is present |
Step 8. Setting the temperature to 100 F (38 C).
|
Step 7. Carefully remove the handle without rotating it and install the temperature limit stop with the red dot at 12 o’clock. |


|
Step 8. Slide the handle back on with the push button at 12 o’clock. To secure the handle:
|
When installed correctly there should be a gap of 1/16" (1mm) between the handle and the sleeve. |


 |