How to replace cartridge and balancing spool in a PB valve (after Oct 2008)
|
This article explains how to replace the cartridge and balancing spool for a double-action pressure balanced valve. If your valve is a cycle valve, you should have received a new handle and dome along with the cartridge and balancing spool.
|
Double action
Lift handle to open water |
Cycle
Rotate handle to open water |


Preparation: |
Important: Turn off the water supply at the faucet before starting. You can either turn off the main supply to the house or close the shut-off valves if the faucet is equipped with them. Then open the faucet again to empty it of residual water. Failure to do so could result in flooding or injury.
- Recommended tools: Handle requires either a 2.5mm allen key or Phillips screwdriver, Phillips and flathead screwdriver (if you remove the plate), adjustable wrench, soft brush
Instructions: |
Step 1: Remove handle according to your model |
|
|
|
|
|
|


Step 2: Remove the plate (if you are shutting off the water supply through the service valves; if you are shutting off the water supply main to the house, go to step 4). |
Plate without exposed screwsA or B
1 ) Remove finish plate 2 ) Unscrew screws and remove back plate |
Plate with exposed screws
1 ) Unscrew screw caps and screws 2 ) Remove plate |


Step 3: Shut off water supply through service valves |
|
|
Using a flathead screwdriver, turn the service valves 1/4 turn to bring them upright. Then open the tap to empty the residual water
Service valve model may differ from one shown, but the way it opens and closes is the same. |

Step 4: Remove trim according to model A or B |
|
|
|

Step 5: Remove the nut, cartridge, balancing spool and clean |
|
Unscrew retaining nut |
Pull out cartridge and balancing spool |
Inspect interior and seat, remove debris and if necessary, clean with a soft bristle brush. |
Flush the valve and lines by slightly opening the service valves on each side alternately for 20 seconds (See step 3). Be careful not to burn yourself |


Step 6: Install cartridge, balancing spool and reassemble |
|
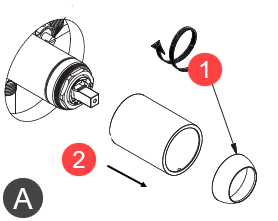
Install the balancing spool (1) and cartridge (2) making sure the 2 locating pins are aligned with the two holes of the valve seat. |

|
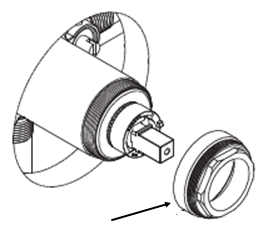
Hand-tight the nut firmly |
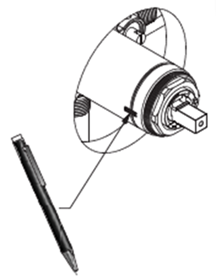
Make a mark with a pen |
Tighten an additional 1/4 turn. It is normal to see threads between the sleeve and the nut. |

|
Reopen service valves and reinstall plate and handle |
|
|
